Monday, March 28, 2011

Why together.

This weekend we took our first family overnight trip to Baltimore's Inner Harbor. The trip was for my husband and my annual anniversary get-away, but this year, the trip was designed around a certain little guy in our lives. 

We went with the hopes of really getting out there and spending time together, doing something that Ethan would love....playing. The message in the Toddler Trails section at Port Discovery read something like "Playing together not only instills a sense of togetherness, but confidence." Important stuff!!


I don't think enough can be said about this type of quality time, and my hope is that it becomes the essence of this blog. I've said it before, I'm a full-time working mom. (Although, never undervalue a good daycare learning center for additional opportunities to learn, grow, and interact!) We move through our days in a delicate balance of time together, time for the daily grind, time for ourselves, time to learn, and time to spend with our friends and family. Most times, it's really hard to divvy up that time...

Ultimately, what this means for us is that our time together is more rare and valuable. It means that we need to use our time together wisely, and it needs to be fun for everyone!~ (without being a burden--even financially) The payoff is huge, and is so incredibly evident.

As I was changing Ethan in the restroom, showering him with please and thank you, a mother next to me was telling her young child to shut up; I was reminded of just how fragile that time can be.

Getting off my soapbox for the evening, I hope to journal some of the creative ways in which we craft play together as a family in hopes of sharing what we think are some fantastic opportunities for play, learning, and development. 

I'm always on the hunt for new and exciting things to do, and I can't wait to share the fun that we had in Baltimore in my upcoming posts! (and hopefully some of the great simple craft ideas we had while we were there!) 

Thanks for reading! (and listening!)

Tuesday, March 22, 2011

Finger painting with Baby

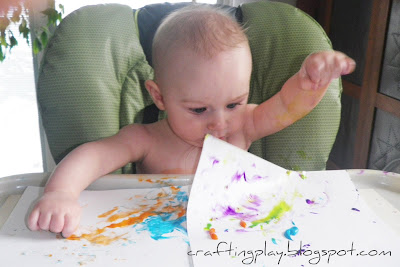
I started finger painting with Ethan when he was 5 months old. It was a perfect age to get him started, and he loved it right off the bat! (The ironic part is that as a child, I always thought that I wanted to finger paint--until of course I realized that meant that my fingers had to get messy!)

It's easy to do, and although messy, it's an easily controlled mess!
Ethan's first time finger painting at 5 months.

Set up and Go!
We paint in the highchair, stripped down to a diaper. I have a splat mat on the floor just in case! We keep a box of wipes next to us at all times (along with the camera, of course--I mean, have you met me?!)

I usually set up before putting Ethan in the high chair. I tape a few pieces of paper down to the tray and put a few blobs of paint on the paper to him to smear around. Only after the paper is ready do I put him up in the chair. When he was first learning, I'd sometimes smear my fingers around in the paint a little, just to demonstrate what to do. It didn't take long before he figured it out himself! Then, I leave it up to him to do the work! I'll add paint for him as we go along.


Does he eat the paint?
I've found most times he is really too busy smearing to put the paint in his mouth (although the paints are non-toxic just in case). I have to be careful when adding more paint because Ethan has a tendency to get upset when I don't let him have the paint tubes (the corners on the tubes are a bit sharp). I've also heard that you can put the paints in ketchup and mustard bottles from the dollar store if this is a problem. Also, if you're concerned about paint ingestion, you can use baby food (although those finished pieces would most likely need to be photographed, and then disposed of--no one wants a moldy painting!)

Clean up
We usually just use wipes to clean up, but sometimes we just jump right in the tub!

The best part?
Ethan gets to play with color, texture and artistic expression. It also helps work on fine motor skills. When we're done, he gets a piece of artwork that we hang on his bedroom wall. He looks at them a lot and we talk about what a good painter he is!

Not to mention- It's really fun, and something that we both enjoy doing together!!

Not only is this Ethan's artwork, but also the background for this blog!

Easy Squeezey Handprint Gift Tag

Yesterday I posted how to make handprint tulips with your favorite little person. They were created as a gift (although I loved them so much I made more for myself!)


So, what’s a gift without a gift tag?!?

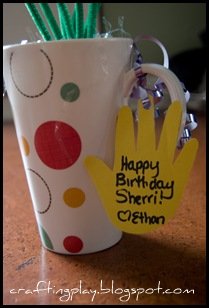
A handprint gift tag was easy and worked perfectly with handprint tulips.
DSC_7198DSC_7199

They’re super easy! (and did I mention that you can pretty much make them for free!)
  • Trace and cut out a handprint
  • Use a hole punch to punch in the middle finger (If your little person’s hand is small, put a small piece of tape on the finger first before you punch the hold to add reinforcement!)
  • Thread curling ribbon (or even satin ribbon) though the hole
  • Tie a knot in the ribbon just above the hole (this will help the tag lay properly)
  • Attach to the package and curl the ends of the curling ribbon.
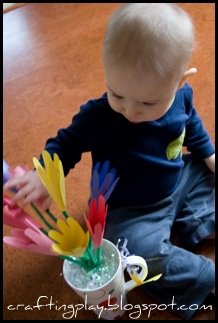
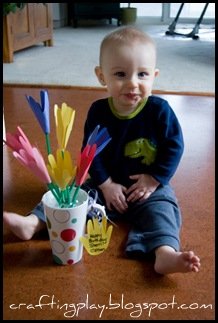
Here’s Ethan enjoying his now complete gift. We were talking about how he helped make the tulips, and doesn't he look proud?!?!!
DSC_7207DSC_7227

Monday, March 21, 2011

Spring is Here Tulips!

So springtime is FINALLY here! Hurray!

Ethan's teacher's birthday was this weekend, and I wanted to help Ethan do something special for her. I was thinking maybe he could paint a card. With some of the fun things for babies to do that we've shared, I knew that just wouldn't do. I was in the car, driving home with a vase full of daffodils in my cup holder. It was 70 degrees out, and I had a serious case of spring fever...long story short... I started thinking about making flowers and remembered this lily craft that I had seen. At that point, I said "Self...this is on the right track."

Lilies, no. But TULIPS...yes! Off to the craft store for more pipe cleaners I went...


How to Make Baby Spring Handprint Tulips
Supplies:
Baby (or kid...or adult...)
Construction Paper
Pen or Pencil
Scissors
Pipe cleaners- Green variety best.
Clear tape
Glue stick
Vase (optional)
Easter Grass or Gift Shred (optional)
Oasis (optional)
**Did I mention this project is done on the cheap! You can even sub drinking straws for pipe cleaners**


1. Trace one of baby's hands onto construction paper and cut out. This ends baby involvement (unless you're using an older child), but don't underestimate the excitement to be found in playing with a piece of construction paper while you continue making tulips. Left over paper remnants were popular with Ethan ALL weekend!

BTW, he's squealing!
2. Using the print you just cut as a template, trace multiple handprints onto different colored construction paper. Remember, you will need two prints to make one tulip.

3. Cut out your handprints. I found that I was easily able to stack two pieces of paper to cut out two prints at a time.
(Steps 4-6)
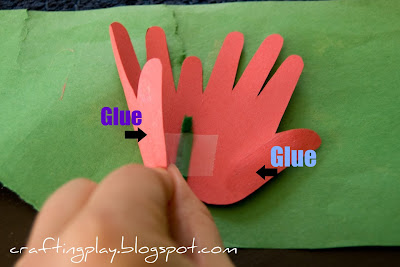
4. Now you will glue two of the handprints together. Glue together placing one pinky finger directly over the other pinky finger (thumbs facing away from each other). Wait for the glue to dry before proceeding.

5. To add the stem, take a green pipe cleaner and tape it up the center of the two handprints. It should go about half way up the center of the tulip (less for larger hands).

6. Two strips of glue now get applied to the opposite sides of both thumbs (see the photo above).

7. Shape the paper into a cone, overlapping the ends, and press down firmly to adhere the glue. It's a good idea to hold the seams for a minute until the glue sets.

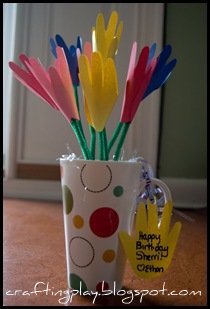
8. Your first tulip is now ready! Repeat until you've created the desired number of tulips. Odd numbers usually look best in a vase, although I was very happy with 8 in each of mine (two of each color).

9. To stagger the height of the flowers, bend up the end of the stem 180 degrees at varying heights. When you're happy with the way they look, wrap on of the tulip stems tightly around the rest of the stems to keep all of your flowers in a tight bunch.

10. Place the tulips in a vase. (I used a plastic mug to be safe at Ethan's daycare, and a vase we received "welcome baby flowers" in for my desk at work). If you want, you can put some oasis in the bottom of the vase to keep the flowers stable.

11. Use Easter Basket grass or Gift shred around the stems in the vase to hold them securely upright and finish the look of the vase.

12. Finesse the arrangement by gently bending any of the tulip stems, as needed.

13. Sit back and enjoy! (And don't forget to share the finished product with baby, and most importantly, pride them on a job well done!!)

The finished tulips are so bright and colorful. They make great gifts...and Mother's Day is just around the corner!!

Thursday, March 17, 2011

The Unicorn

What a great song for everyone to enjoy this St. Patrick's Day!

Monday, March 14, 2011

Celebrate Pi Day 3.14

Today is March 14...or 3.14.

There's no better day to celebrate the more than 67,000 decimal places in the ratio of circumference to diameter of a circle. Ok, enough- that just hurt my brain!

So how does Pi appeal to everyone's senses? 

1. Ever wonder what Pi tastes like?
I don't know about Pi, but PIE is delicious. I urge everyone to have some today. (I think Ethan is going to delight in some Peach Cobbler--that's almost like pie)

2. Ever wonder what Pi sounds like?
Watch the following video by Michael John Blake where he turns 3.14 into an amazing song, and a great way to expose kids to new sounds and rhythms.

The beginning of the video showcases the formula behind the composition, and then on to the music:


Like the song? It's available on iTunes.

Can't get enough?
Dust off the guitar, xylophone, piano...and use it as an excuse to play together.
Doesn't matter how you choose to play...music always sounds fun!
And as always, ENJOY!


Friday, March 11, 2011

St. Patrick's Day Shamrock Craft

Last weekend Ethan crafted in anticipation of St. Patrick’s Day next week. I drew a shamrock template in Illustrator, printed it out, and got out Ethan's finger green paint (if you choose to use my template, or any printout for that matter, the higher weight paper, the better--wet paper tears easily!). The one shamrock Ethan filled in completely with his creative little fingers. On the second shamrock, we used three fingerprints and  drew a stem with a green marker to make a fingerprint shamrock.

Take it up a notch?
We made the painting a texture exploration by adding green sugar sprinkles to the green paint.
When he was done, I added a bit of glitter to give them an extra kick. We let them dry and I cut them out (after all casualties were mended with tape).


So now what??
Here's some suggestions:
  • Paste them back to back and hang from the ceiling
  • Glue them to a folded piece of construction paper to make a homemade St. Patrick's Day card
  • Frame and hang
  • Add to the refrigerator art collection
Enjoy, and don't forget to download the free shamrock template.

Tuesday, March 8, 2011

Fat Tuesday FUN

A big part of Crafting Fun is finding creative (and EASY) ways to craft fun! DSC_7056This morning is Fat Tuesday, and I woke up wishing I had some sort of Fat Tuesday craft in my back pocket that would could whip up before we headed off to work and school. Well, maybe I do…but not under those kinds of time restraints….

Solution?
Dig my stash of Mardi Gras beads out of the closet and present them to 7 month old. Success! He was quite mesmerized by them for a good portion of the morning. No bead stash of your own? A cheap trip to the party store can fix that!
Fun and festive!! (As always, these are great fun for a baby, but should always be used with adult supervision!!)


I hope to have a Mardi Gras craft ready to post this week, but if it never makes it out of brain and on to paper, I leave you with this great craft instead:


This craft is from The Handprint and Footprint Art blog, which I LOVE.

There are a lot of great crafts and inspiration to be found by Amanda there for a wide range of ages. Enjoy!


If you’re in Fasnacht country, enjoy! Otherwise, eat up…Fat Tuesday should be just that!

Thursday, March 3, 2011

Read Across America-Dr. Seuss Day

DSC_6069Yesterday, March 2nd, was Read Across America Day. Annually, Read Across America corresponds with the birthday of Theodore Geisel, aka Dr. Seuss!
I was aware of the event a little too late in the game to craft up anything too exciting, but we did read some Dr. Seuss before bed.
This is Ethan with Mr. Bird and a Wocket in my Pocket character when he was 4 months old!

Looking for a follow up activity?
Green Eggs and Ham Egg Carton Crafts
Green Eggs and Ham Picture Frames
The picture frames would look great printed on colored printer paper. How cute with a photo of the kiddo reading the book?!
Older kids? These recipes look very fun! All recipes said to “feed 4 hungry green-egg lovers!!”
Green Eggs and Ham Recipes

Tuesday, March 1, 2011

What? Another Blog!?

Ok, I get it. I'm great at thinking that I want to start a blog about xyz, and quickly losing my momentum. I have learned from these blog graveyards, and ultimately it boils down to two things: lack of enthusiasm and lack of enough fresh and new content. This time, I think I just may have it!


So what is Crafting Play? 


Well, since my son Ethan was five months old, I've begun searching for creative art projects and things we can do to have fun TOGETHER. My number of internet searches have all turned up very little results. There are so few resources that cover the specific resources I've envisioned finding. And it's not just me! I've heard the same gripes from other parents with young children. As a result, I've had to get creative! Since then, I have received a number of supportive comments that suggest that I should DO SOMETHING with all these ideas. So here we go, I'm doing something!


These are just some of the topics I can envision this blog addressing:


1. Learning through art
Being a graphic artist myself, I'm very interested in the importance of art education.
2. Art and Craft projects as a method of play at ANY age 
By ANY age I mean as young as 5 months old--have you tried to find art projects for a 5 month old? Good luck!)
3. Creative Art projects 
Things that you can create to enhance fun and play for children
4. Places and Things to do 
Things that can be fun for the WHOLE family, specifically within day trip distance of the Central Pennsylvania area.


There will be more too. So many ideas...Stay tuned....

LinkWithin

Related Posts Plugin for WordPress, Blogger...